Launched on the US market in 2012 and adapted to the Italian power grid only two years later, the Nest Thermostat is an intelligent device for the control and management of the heating system in your house. Equipped with Wi-Fi, this thermostat can also be controlled remotely allowing you to adjust the room temperature even when you are out. With this “small computer” connected to the system, you can optimize the energy consumption for generating heat, avoiding waste and unnecessary expenses.
In this review, we will explain all the functionalities of this time based thermostat and how to install it correctly.
Installing the Nest Thermostat
When opening the product packaging, in addition to the thermostat itself, we also find another white squared device, the HeatLink, that represents the physical connection component with our mains. It is a kind of a transformer that receives an input power supply of 220-230V and generates an exit output of 24V, allowing the thermostat to work properly. The thermostat must not be directly connected to the home mains, as it does not present any tension-reducing device.
In addition to supplying the correct voltage to the thermostat, the HeatLink device is also used as a connection with the current heating system in the house (such as the boiler). Basically, two pairs of cables protrude from the HeatLink: one is directed to the Nest Thermostat, while the other should be connected to the electrical clamp installed on the boiler, that manages the on-off pulses. Since the HeatLink device doesn’t necessarily need to be visible in the apartment, it can be installed without any problems close to the boiler and reach the thermostat through a dedicated walled channel or through any other connections that the owner of the premises may choose.
The connection between the HeatLink and the Nest Thermostat is potentially the only challenging job, especially in those contexts where a certain distance between the two elements, needs to be covered. In such cases it may be appropriate to ask for the help of an electrician, who can assess the best technical and aesthetic solution.
After having connected the Nest Thermostat with its communications and power component (HeatLink), we can proceed with the configuration of the device referring to the user manual, supplied with the product.
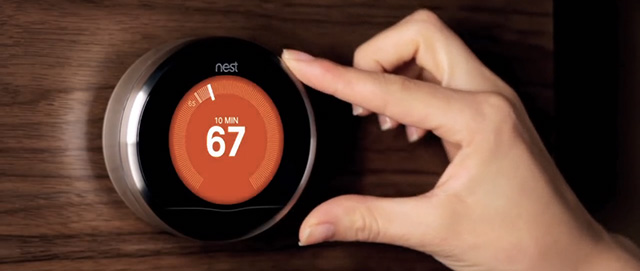
Setting up the thermostat and main functions
As it is the case with the majority of electronic devices, the first setting relates to the user preferred language. Unfortunately, at the time of writing this review, the manufacturer has not yet taken steps to enter Italian in the list of the available languages. However, the steps to configure all the functions are very few and extremely simple.
After setting the language, you must assign a name to the thermostat, which can be inspired by the name of the premises where it is located. This feature, that can be easily set by the simple rotation of the metal outer ring, becomes especially useful when several thermostats Nest are going to be installed.
Continuing with the data entry process, the thermostat will also ask you to set the type of the heating system existing in the apartment. At this point, always by turning the outer ring, you must specify whether a traditional gas boiler connected to wall radiators is installed or if the house is heat through an electrical system. In addition, you should also indicate the possible presence of an underfloor irradiation system. All these pieces of information allow the thermostat to suitably calibrate its operation algorithms for the maintenance of the desired environmental temperature.
The last step of the configuration process is related to the parameters of the wireless communication protocol (Wi-Fi). This function allows you to manage the thermostat remotely, by connecting it with a wireless router that is to say, via a smartphone. You should have previously installed a specific app on your mobile phone.
The connection to the Internet via the home router, will provide access to the thermostat potentially from any terminal connected to the network. It will also allow you to receive a wide range of information, including, for example, weather forecasts, and firmware updates released by the manufacturer.
As it is case for many modern “intelligent” thermostats, the Nest thermostat is able to “retain” useful environmental information and habits of the inhabitants of the premises, as well as thermal requirements. Thanks to these pieces of information, along with those concerning the characteristics of the heating system, the thermostat Nest can regulate the temperature, considering in advance the amount of time needed to reach the thermal values set at hourly intervals.
The software app installed on your smartphone or on your PC is also a great tool to monitor the operating status of the system. This helps the user to accurately assess the performance of the system, as well as to identify any changes to the program, that need to be made for obtaining further savings on energy bills.
Conclusions
Therefore, the Nest Thermostat is a useful tool that helps you to wisely manage your home heating system, along with the possibility of controlling everything either via the Wi-Fi function or from the app installed on your smart phone.
For those who wish to use the thermostat only remotely using a fixed Internet connection, the Wi-Fi function may seem useless. If this is the case, it may be useful to know that cheaper thermostats are available on the market and that can be directly interfaced with the Ethernet network cable, without a wireless communication card.
Since the thermostat Nest was made for the American market, whenever you try to use it in Italy, you should check the specification of the compatibility with the European grid power system, to avoid inconveniences during the installation.